Monday, December 29, 2008

Carmelized Onion and Sun Dried Tomato Foccacia Bread

Occasionally my handsome hubby and I find ourselves chilling together, flipping thru channels on the tube and come across shows that we honestly never would have thought that we would watch when we were younger. Documentaries, This Old House, the Antiques roadshow, travel shows etc. Basically the things that are on all day Saturday that your dad would be watching when you wanted to watch cartoons as a kid!!!
Anywho I find myself yelling "stop!" . . . "Go back to that they were cooking something," which just thrills my hubby to death because the cooking shows that I find are the ones that I thought were so boring as a kid but now have me rummaging in my pantry and flouring up my kitchen. Which is how this recipe came about. I saw Foccacia bread being made on TV and came up with my own recipe. I am now HOOKED on Foccacia bread and will make it every chance I get. It is crusty on the outside and soft on the inside. I seriously wanted to cry when my husband cut himself a second piece at lunch today! (the ultimate compliment!!!) It was soooo good! I just can't help but toss in sun dried tomatoes and caramelized onions into just about everything! I love them! They certainly kicked Foccacia bread up a huge notch for me! A new fave was made!
Caramelized Onion and Sun dried Tomato Foccacia Bread
Recipe by: Emily

4-4 1/2 cups Flour
1/2 cup Warm Water
1 tsp Dry Yeast
2 tsp Salt
1 cup Warm Water
1 medium Onion, sliced very thin and caramelized
1/4 cup Sun Dried Tomatoes, in oil, chopped
1/2 tsp dried Basil
1/4 cup Parmesan Cheese, shredded

1.Mix together 1 tsp yeast, 1/2 cup flour and 1/2 cup warm water in a large bowl, cover loosely with plastic wrap and allow to sit in a warm place over night. (This allows a "sponge" starter to form as a base for the dough.)
2. Slowly add 1 cup of warm water to the "sponge". Then mix in 2 teaspoons of salt, 1/2 teaspoon of basil, and 4 cups of flour. Add 2/3's of the caramelized onion and 1/4 cup chopped sun dried tomatoes to the soft dough and knead on a floured surface adding more flour as needed until a firm dough forms. (Kneading takes about 8-10 minutes)
3. Place the dough into an oiled bowl turning dough over once to cover the entire surface lightly with oil. Loosely cover with plastic wrap and allow to rise for about an hour, or until double in size.
4. Turn dough out onto a lightly floured sheet pan or a baking stone and stretch into an 11 or 12 inch circle. Brush the top with olive oil and then sprinkle remaining onions over the top. "Dimple" the dough with your fingers and then sprinkle with 1/4 cup Parmesan cheese and 1 teaspoon of coarse salt over the top.
5. Bake in a preheated 375 degree oven for 15-20 minutes, until browned. Transfer bread to a wire rack to cool. Slice into wedges and enjoy!

To caramelize the onion, I slice it very thin and cook it for about 45 minutes to an hour over medium low heat with a little bit of sugar in a frying pan until very soft and caramelized. You may need to add a little bit of water throughout the cooking process to keep the onions from drying out.
Friday, December 26, 2008

Chocolate Chip Cinnamon Roll Wreath

Mensch! Another Christmas has come and gone . . . too soon! I was a major slacker about blogging during this month . . . but I did make a ton of goodies and we had some great food . . . which is piling up in my fridge waiting for creative uses!
For breakfast Christmas morning we ate a Christmas wreath! (How festive are we!) I made it the day before actually and just iced it before we tore into it. I filled it with my favorite things in cinnamon rolls . . . chocolate chips, pecans, brown sugar and cinnamon! My mom always made cinnamon rolls with chocolate chips and that is just the way I like them! (I am NOT a raisin fan . . .)
It was great to wake up, open presents, eat breakfast, and hit the hay again for a little more snoozing. This Christmas just flew by! Which means school will be starting again in a little over a week! I need a little more breather time I think . . . or at least some serious fun for New Years to prep. for the coming semester! We'll see if I can get anything else whipped up in my kitchen before spring semester begins!


Dough Recipe
Recipe by: Mama P1/2 cup Warm Water
1.5 Tbsp Yeast
2 Eggs
1/2 cup Oil (I like to use butter instead)
2 cups Milk
1/2 cup Sugar
2 tsp Salt
6-8 cups Flour

Dissolve yeast in warm water. Mix milk, sugar and salt in a sauce pan and scald. After the milk mixture is cool add the eggs, oil an d yeast mixture. Add enough flour to make a soft dough. Cover and let rise until doubled in size. Roll out the dough into a rectangle until dough is about 1/3 an inch thick. Spread dough with melted butter, then sprinkle generously with cinnamon, sugar (white or brown), chocolate chips, and pecans. Roll into a log and transfer to a large sheet pan or pizza pan. Shape dough into a circle and crimp connecting ends together. Slice a little more than half way through the dough to form a circle of connected cinnamon rolls that you can fan out and over lap into a wreath shape. Raise until double and then bake in a preheated 375degree oven for 15-20 minutes until golden brown on top.

You can use any filling that you want, another filling that I love is raspberry cheesecake!

For the icing I just mixed 1/3 cup softened butter, about 1 1/2 cups powder sugar and a couple of tablespoons of milk until I got the consistency that I desired and drizzled it over the top. You can also add green food coloring if you want to.

Wednesday, December 17, 2008

Chocolate Chip Biscotti

I feel like someone is standing above our town dumping bag after bag of snow over us! Does anyone else feel this way? It wouldn't get on my nerves so much if we could just stay inside and didn't have to venture out into it . . . or if I just went outside to watch it fall rather than donning my boots to dig my car out . . . oh well . . . I knew it was coming I was just hoping that it would stay off of the roads this year!
Dare to dream! In fact my hometown is getting dumped on which is VERY unusual since it is a hoarding place for snowbirds to go and get away from cold weather. But talking to my Mutti revealed that they too have been getting snow . . . and she is thrilled! Of course she was raised in the colder parts of the state . . . whereas I am a light foot in the cold/snow department. When I first started college my little sisters were always so excited when we talked on the phone and they heard that it was snowing . . . of course they have never experienced the joys of traipsing across campus hoping not to fall and and biff it in front of a cute guy or getting to class looking like a wet dog! (You missed out ladies!)
Snow is a good time to do some baking though! I love being all warm inside and turning on some Christmas tunes . . . rocking out to Jingle Bells and enjoying the scents of the season wafting through my house! In fact baking this year has led me to a new love! Biscotti! I have found/seen some great biscotti recipes but when I found this one and saw how easy it was . . . it won over my kitchen! Plus my handsome hubby got in on the game as my chocolate drizzler! These are going to be great to give away this year!

Chocolate Chip Biscotti
Recipe by: Betty Crocker

1 pouch (1 lb 1.5 oz) Betty Crocker chocolate chip cookie mix
1/3 cup butter or margarine, softened
1 egg
1/4 cup all-purpose flour
1/2 cup toasted chopped hazelnuts (I used sliced almonds)
1/2 cup cherry-flavored dried cranberries, coarsely chopped
1/2 cup semisweet chocolate chips

1.Heat oven to 350°F. In large bowl, stir cookie mix, butter, egg, flour, hazelnuts and cranberries until stiff dough forms. Shape half of dough at a time into 8x2 1/2-inch rectangle on ungreased cookie sheet. Bake 20 to 25 minutes or until golden brown. Cool on cookie sheet 15 minutes.
2. Cut crosswise into 3/4-inch slices. Place slices, cut sides down, on cookie sheet. Bake 10 to 12 minutes, turning once, until crisp. Remove from cookie sheet to wire rack. Cool completely, about 20 minutes.
3. In small microwavable bowl, microwave chocolate chips, with 1/4 tsp cooking oil, on High 30 to 60 seconds; stir until smooth. Drizzle chocolate over one side of each biscotti. Let stand until chocolate is set. (The oil helps keep the chocolate from drying out and becoming discolored and white)
Okay after trying these cookies I am major hooked! They are DELICIOUS! They have a great cookie taste/texture left even though they are crispy! They are great!

Thursday, December 11, 2008

Mom's Famous Fudge

I am sitting here waiting for 5:00 to roll around so that I can e-mail in my second to last final (yep he won't take it before 5:00 . . .) while indulging in yet another piece of fudge! (Hey I have been very stressed!) My mother makes the absolute best fudge that the world has ever seen! Her recipe is a little piece of heaven on earth (one that has paid a visit to my hips this week)! Growing up I always looked forward to my mom making homemade candies and bringing treats around to friends and neighbors! We had one Christmas cassette tape in particular that we played over and over, which I just loved, until someone yelled to turn it off. I would pop it into our big silver stereo (complete with record player and A-track), turn it up and go in the kitchen and help my mom, unless the candy was really hot, then I would lean away from the counter and watch her work . . . stirring quickly, sometimes spilling red food coloring on a good dish cloth, checking the candy thermometer's temperature not wanting to cook anything too long, buttering pans and unrolling wax paper, wondering aloud if she had added vanilla in already, then adding some more . . . it was always entertaining to watch! (Thanks Mutti!)
Their were always so many goodies that we looked forward to and so many recipes from family members and friends to pull out from different cookbooks, or that were written on envelopes from old letters, or on certain recipe cards that we identified by saying "its the one that had something spilled on it remember" or "it was written on the back of a grocery list." (those were treasures . . . we never re-wrote them, because they were better the way that they were!) Oh memories! But of all the goodies that were made I think fudge and toffee were the best! I tried to make toffee the first year that I was married and it just didn't turn out as good as my moms . . . but when I make my mom's fudge it just always is sinfully good! (Which is very dangerous during finals week!) I promise you that this is the best fudge you will ever have! It is SUPER rich and creamy and doesn't have that "cocoa" texture that some fudges do!
Fudge
Recipe by: Mama P

1 can Evaporated Milk
2 Giant plain Hershey or Symphony Chocolate bars
1/2 cup Butter (use the real deal!)
5 cups Sugar
1 1/2 tsp Vanilla
1 cup Miniature marshmallows
1 cup chopped nuts, optional

1. Chop the chocolate bars and set aside along with the 1 cup of marshmallows.
2. Melt butter in a large sauce pan over medium heat, add sugar and evaporated milk. Bring to a boil and cook for 4 minutes then remove from heat.
3. Add the chopped chocolate, mini marshmallows, and chopped nuts to the milk and sugar mixture. Stir until the choclate and marshmallows are melted. Pour into a 9x13 pan that has been lined with foil and then butter. Refrigerate until firm, cut into squares. Indulge and melt with pleasure!

Tuesday, December 9, 2008

Asparagus Soup with Garlic Croutons

Today is the day that my handsome husband has spent countless nights dreaming about . . . his last day of college!!! (Well until graduate school . . .) Yes my Toph is graduating with a Bachelors degree in Sociology! Congrats, congrats handsome! He is so excited and I am so very proud of him! To celebrate we went out to eat and then watched the new batman movie (it came out today on DVD . . . um I think I closed my eyes through most of it!)
I decided that I had better post something without chocolate in it to break up my ever increasing baking blogs. (I made fudge yesterday . . . had to be done . . . I don't want everyone thinking that our house is overran with sweets . . . it really is not!) With the snow making its presence known their is absolutely nothing more comforting than a hot bowl of soup to warm you up and make you forget about getting to dig your car out! I personally love asparagus and I especially came to love Spargal (white asparagus) while living in Germany and Austria . . . but I have yet to see it in the US. If you ever see it or get the chance to eat it . . . DO! In Germany they smother it with melted butter and toasted bread crumbs! It is an absolute delight! Love it! Love it! Asparagus soup is a close second though and I love the wonderful taste and texture that roasting them gives them.
Asparagus Soup with Garlic Croutons
Recipe by: Emily

1/2-3/4 lb Asparagus
2 1/2 cups Chicken or vegetable broth
1/2 cup half and half
2 Tbsp Olive Oil
1/4 cup Shallots, minced
2 Tbsp Chives, chopped
1/2 tsp Thyme
Salt
Pepper
1. Place the asparagus on a cookie sheet and coat with 1-2 tablespoons of olive oil and then lightly salt and pepper them. Roast the asparagus in a 350 degree preheated oven for 15-20 minutes. (I like them soft!)
2. Saute the shallots in 1 tsp of olive oil in a large sauce pan until translucent (5-8 minutes). Then add the chicken stock and thyme and bring to a simmer.
3. Coarsely chop the roasted asparagus and add to the chicken stock. With a hand blender puree the stock and asparagus until smooth. Season liberally with salt and pepper to taste.
4. Turn the heat off and add the half & half and chives. Serve with additional roasted asparagus spears and garlic croutons if desired.

Garlic Croutons
4-5 thick slices of regular white, french or Italian bread
3 Tbsp Butter
Garlic Powder
Parsley Flakes

Cube the bread slices and spread out on a cookie sheet. Melt the butter and use a pastry brush to coat the bread cubes on all sides. Sprinkle lightly with garlic powder, tossing to coat well. Sprinkle with parsley flakes, salt and pepper. Bake in a preheated 400 degree oven for about 3 minutes, toss croutons again then continue baking until golden brown. Serve on top of soup. Enjoy!

Wednesday, December 3, 2008

Cabbage, Caramelized Onion, and Bacon Gratin

Paula Deen owns the key to part of my husbands heart! He served his mission in the south and ever since has just loved southern cooking. When we had only been married a few weeks he gave me a few cookbooks that I love . . . one of them being from Miss Paula! Her recipes are overall simple to make and are "down home" all the way!
I made this pork loin using Paula's herb crusted pork recipe (which was SOOOO delicious!) and came up with a cabbage gratin to serve with it weeks ago and have been meaning to blog it . . . but it hasn't happened until today! Oh well. This is my little break from writing my Political Geography paper.
I can only take so much world economics in my head at a time! I am writing about Post-Cold War Russia . . . it's very interesting . . . but lets talk cabbage! I love cabbage! It is such a great veggie to add to just about anything (I think!) . . . toss in some bacon, cheese, cream, and caramelized onions and I am set for life! My mom always made amazing stir fry with long strips of cabbage in it and I loved it! Mmmmm!
Cabbage, Caramelized Onion, and Bacon Gratin
Recipe by: Emily

1/2 Cabbage head, shredded
1 1/2 cups heavy cream or 1/2 & 1/2
1 1/3 cup shredded cheese, Parmesan or Italian blend
1 large Onion
5-6 Strips Bacon, chopped
1 tsp sugar
1 1/2 tsp Salt
1 tsp Pepper

1. Thinly slice the onion and cook it in a frying pan with the one teaspoon of sugar over medium low heat until caramelized. Add the shredded cabbage and cook for a few minutes until the cabbage and onions are mixed and the cabbage begins to soften. Pour cabbage into a casserole dish and spread out.
2. Crisp the bacon in the cabbage frying pan, lower the heat and add the cream, 1 cup shredded cheese, salt and pepper. Once the cheese has melted pour the cream mixture over the cabbage and top with additional cheese if desired. Bake in a 325 degree oven for 20-30 minutes, until the gratin is bubbly and the cabbage is cooked. Enjoy!

Monday, December 1, 2008

Savory Sundried Tomato and Artichoke Cheesecake

Wowser! Another Thanksgiving has come and gone and from the looks of many blogs it didn't phase anyone! Me . . . I have been battling a nasty sore throat, flu, earaches etc. The past few weeks and have had no gumph to blog! Now with finals hovering over me waiting to pounce on me next week . . . I am ready to take a minute and share one of my new favorite creations! Sun dried Tomato and Artichoke cheesecake. . . Okay it is an appetizer cheesecake . . . meaning it is meant to be enjoyed on crackers or crusty bread! It was one of my contributions for our Thanksgiving feast and was a total delight!
My handsome husband and I also whipped up some pretty mean cream pies including chocolate, praline pecan, and coconut cream. I love pie! My mom always makes so many different kinds and our favorite day after Thanksgiving breakfast is . . . pie! A great breakfast to prepare for a killer day of shopping! Yes the gals in my fam are crazy and we wake up 5 minutes after going to bed to hit the sales! This year wasn't so bad though . . . we avoided the stores that had blood trails leading into them and seemed to be done faster than in years past! Then of course we converged at my Mutti's and made some darling Christmas trees! (We are so crafty!)Savory Sun Dried Tomato and Artichoke Cheesecake
Recipe by: Emily
3 packages Cream Cheese, at room temperature
3 eggs, lightly beaten
1/2 cup Sun Dried Tomato's in Oil, chopped
1 medium Onion, sliced thin
1 14 oz Can Artichoke hearts, coarsely chopped, reserve 2 Tablespoons of the liquid
4 oz Feta Cheese, crumbled
1/4 cup Parmesan Cheese, shredded
1 tsp dried Basil
1 tsp Sugar
1/2 cup dry bread crumbs
1 1/2 Tbsp melted butter
1 clove Garlic, minced
1 tsp Salt
1 tsp Pepper

1. Caramelize the sliced onion with 1 tsp of sugar over medium low heat for about 30 minutes in a pan. Set aside onions.
2.Mix the bread crumbs and 2 tablespoons melted butter together and press into the bottom of a 9 inch spring form pan.
3. Beat the cream cheese in a large bowl until smooth with a hand mixer. Add the feta cheese and beat until well mixed.
4. Add the eggs, basil, salt, pepper, garlic, and the reserved 2 tablespoons of artichoke liquid and mix until just incorporated.
5. Fold in the sun dried tomatoes, caramelized onion, Parmesan cheese and artichoke hearts. Pour filling into the prepared 9 inch spring form pan and bake in a 325 degree preheated oven for 35 minutes. Allow cheesecake to sit at room temperature for 30 minutes on a wire rack and then chill for at least 4 hours before serving. To serve slice cheesecake into wedges and spread on crackers or toasted or crusty bread. Enjoy!

Monday, November 24, 2008

Zucchini Pancakes

Auch du meine gute! Thanksgiving is just a few days away now! This year has flown by sooooo quickly! Well unless you were waiting for the movie "Twilight" to come out (guilty)! Yep I was among the masses who saw Twilight this past weekend! We had a group of women going (ALL of my sisters, SIL, Mutti, and friends) and had a blast! (three gals are missing from the picture!)
It is always quite the adventure when we get together . . . especially for movies! I sat between my two youngest sisters and we were laughing our heads off! I am sorry but some of the lines were so cheesy . . . (if you saw it you know its true!) My mom kept saying "that's not how it is in the book" and "how could they leave that part out?" She was miffed that they didn't have the meadow scene exactly how it was in the book . . . sorry Mutti!
Anywho my house smelled so wonderful yesterday! I was loving life! I made lemon poppy seed bread, cranberry, orange, pecan bread (my new favorite thing!), and gingerbread. My hubby was going hometeaching so I sent him off with plates laden with deliciousness! Speaking of delicious! I cannot begin to say how much I love Ina Gartens zucchini pancakes! I have made them twice in the past few weeks they are so good . . . given I ate most of them over that time period (my hubby doesn't share my love for zucchini so much) If you have never made zucchini pancakes . . . do! D-lish!
Zucchini Pancakes
Recipe by: Ina Garten

2 medium Zucchini, shredded
2 Tbsp Red Onion, grated
2 Eggs, lightly beaten
6-8 Tbsp Flour
1 tsp Baking Powder
Salt
Pepper
unsalted butter and vegetable oil

Preheat the oven to 300 degrees
Grate the zucchini into a bowl and using the large grating side of a box grater. Immediately stir in the onion and eggs. Stir in 6 tablespoons of the flour, the baking powder, salt, and pepper. (if the batter gets too thin from the liquid in the zucchini, add the remaining 2 tablespoons of flour.)
Heat a large saute pan over medium heat and melt 1/2 tablespoon butter and 1/2 tablespoon oil together in the pan. When the butter is hot but not smoking, lower the heat to medium-low and drop heaping soup spoons of batter into the pan. Cook the pancakes for about 2 minutes on each side, until browned. Place the pancakes on a sheet pan and keep warm in the oven. Wipe out the pan with a dry paper towel, add more butter and oil to the pan, and continue to fry the pancakes until all the batter is used. The pancakes can stay warm in the oven for 30 minutes. Serve hot.

Friday, November 21, 2008

Cranberry Pear Chutney

I have always wanted to make homemade chutney . . . so at long last I did! (Just in time for Thanksgiving too . . . it will be wonderful on our Thanksgiving table!) Man almighty does my house smell good! With every ingredient I added a new incredible scent burst from the pot creating a spicy potpourri that I wish that I could bottle and let loose in my house everyday! Cranberries, pears, onions, fresh ginger, lime, orange, cinnamon, and allspice! Love it! Cranberries and citrus go so well together and I love the brightness that the lime and orange add! I am definitely going to make more chutney in the future! I am a little ancy today and am ready to take off when my hubby gets off of work and head south for a weekend to be with my gals! We have a group going to "Twilight" (yes, roll your eyes if you must!) tonight and are doing a girls night out! I need it! I am ready to be done with school this semester and move on! A little chill time is just what the doctor ordered!
Cranberry Pear Chutney
Recipe by: Emily

2 cups Cranberries, fresh or frozen
4 large Pears, not quite ripe, peeled, cored and chopped
1/2 cup Golden Raisins
1 large Vidalia Onion, chopped
2/3 cup Orange juice
1/2 cup pure Maple syrup
1/4 cup regular Molasses
1 1/2 Tbsp freshly grated Ginger
Finely grated zest and juice from 2 limes
2 tsp Salt
1 tsp freshly ground black pepper
1/2 tsp nutmeg
1/2 tsp allspice
1/4 tsp cinnamon
1 tsp brown sugar

1. Sweat the onions for a few minutes over medium heat, add the brown sugar and continue to cook for 2 minutes. Add the pears and cranberries and cook for about 3 minutes or until cranberries start to pop and soften. Add the orange juice, lime zest and juice, molasses, syrup, cinnamon, allspice, nutmeg, salt and pepper and bring to a simmer over medium high heat, then lower heat to medium low and cook for 1 hour, stirring occasionally. Allow to sit at room temperature for 15-20 miuntes and then refrigerate. It will thicken as it cools! Serve with turkey, pork, chicken, or on sandwiches or add to a chicken spinach salad. Serving at room temperature is best! Enjoy!

Monday, November 17, 2008

Panzanella

Okay sometimes in life we find ourselves drawn to things on TV that later lead us to scratch our heads and think . . . okay I just spent how much time watching that movie/show . . .? I can't even believe that this happened last night! I was reading Twilight for the who knows what teenth time . . . and I suddenly found myself watching a movie with Vanilla Ice in it . . . and I watched almost all of it! I have to confess I was caught up in it because I saw it on TV in Austria while I was going to school there (years ago) and was excited because . . . I saw it in Austria! Sadly there are a few movies that I feel obligated to watch when bored and flipping threw the channels for no other reason than I saw it while in Austria, traveling in Germany (remember watching Anaconda April!), or with friends or my sisters when I was a kid/teen! Oh memories . . . Good times!
My family is always interested in making more memories together and now days we find ourselves getting together whenever possible and chowing down! One of the things that I am always asked to make is Panzanella . . . bread salad! It is a serious delight but my family always requests that I add a head of lettuce to it so that it is a bit lighter to eat. It has lots of yummy veggies and get this, hunks of olive oil toasted French bread with freshly shaved Parmesan! What is not to love! You can add or subtract anything that you want too! Panzanella (Bread Salad)
Recipe by: Emily

1 Loaf French Bread, cubed in large bite size pieces (I like using soft and dense bread)
1 Cucumber seeded, stripe peeled and sliced
2-3 Avocados chopped (They add a wonderful creaminess to the salad)2-3 Tomatoes chopped or a pint of grape or cherry tomatoes
1/4 cup Fresh basil (optional)
1/4 cupped Thinly sliced red onion (optional)
3/4 cup Parmesan Cheese, I shave it and mix half in and then shave the other half on top. You can also use shredded.
1 can Artichoke hearts (optional)

Dressing #1: Sweet Garlic Dijon
2 tsp. Garlic (minced)
1 heaping tsp. Dijon Mustard
1-2 tsp. Sugar
1/2 tsp. Salt (kosher or Sea is best)
1/2 tsp. Freshly cracked pepper
1/2-3/4 cup Olive oil

Mix all the ingredients together slowly whisking the olive oil into the other ingredients, taste and adjust seasoning.

Dressing #2 Roasted Tomato
1 pint Grape Tomatoes
1/4 Cup Balsamic vinegar
1/2-3/4 cup E.V. Olive Oil
1-2 tsp Garlic, minced
1-2 tsp sugar
Salt
Freshly cracked Pepper

Sprinkle tomatoes with olive oil, salt and fresh cracked pepper and roast on a baking sheet in the oven until they pop and begin to caramelize. 375 for 25-30 minutes. Mash tomatoes in a bowl with a fork or toss in the blender for a smooth dressing, add balsamic, sugar, salt, garlic, and pepper to taste and slowly drizzled in olive oil while mixing. (With the roasted tomato dressing I usually leave out the fresh tomatoes in the salad and just utilize the flavor from the dressing.)

With the Dressing I actually just taste it and add more of whatever until it tastes right to me.

Toast the bread chunks in olive oil in batches in a pan until golden brown. (Be sure to sprinkle with a pinch of salt while toasting.) Lay out toasted bread cubes on a sheet pan to keep crisp while toasting bread in batches. Add cucumber, tomatoes, avocado, artichokes, 1/2 the cheese, and onion into a large bowl, pour dressing on top and mix well. Sprinkle toasted bread cubes on top and fold all together right before serving making sure all the bread is well coated. Shave or sprinkle remaining cheese on top. You can also cute up a head of romaine lettuce and mix it in as well if you like!

Other yummy add-ins: thinly sliced zucchini or crookneck, olives, sliced peppers, crisp bacon, toasted pine nuts, pepperoni, peppercini’s, mushrooms, roasted red peppers, arugula, spinach, Etc.

Thursday, November 13, 2008

Brownies with Chocolate Cream Cheese Frosting

"I don't understand why so many "so called" chocolate lovers complain about the calories in chocolate, when all true chocoholics know that it is a vegetable. It comes from the cocoa bean, beans are veggies, 'nuff said." -Author Unknown
Darn it all . . . we had some serious chocolate cravings going on in our home . . . (and then I got the stomach flu . . . and they went away fast!) I made some brownies with a killer chocolate cream cheese frosting! Since it is cream cheese it is best to refrigerate it though!
This frosting is easy and you can really taste the cream cheese in it! It also sets up really well and would be especially good as a cake filling!
Chocolate Cream Cheese Frosting
Recipe by: Emily

8 oz Cream Cheese, softened (I use Neufchatel)
1 cup Chocolate chips or Semi-Sweet Chips
2 Tbsp Butter, softened
1- 1 1/2 cups Powder Sugar
1/2 tsp Vanilla

1.Melt the chocolate chips in a double boiler or in the microwave. (Be careful not to burn them!!!)
2. Beat together the cream cheese and softened butter. Add the melted chocolate to the cream cheese mixture and mix making sure to beat the cream cheese lumps well.
3. Add 1/2 cup of powder sugar at a time to the cream cheese/chocolate mixture until you reach the desired consistency. Frost cooled brownies.

(If you like a more chocolaty taste add more chocolate . . .)

Tuesday, November 11, 2008

Cheese Stuffed Meatballs and Quick, Easy and Delicious Marinara Sauce


Okay winter is officially moving in! Today on my way to school I couldn't even see the city it had such a thick blanket of fog laying over it! When I got out of my afternoon class the mountains were finally peeking through, blanketed in a fresh coating of snow! While beautiful, it reminds me of how wet and cold I will get again this winter digging my SUV out each day for the next few months! And of all of the out of state students who aren't used to driving in snow and skid all over the roads by the university making driving even more fun! (Sigh . . . . good times)Believe it or not this Italian meal was inspired by German fare!!! Yes these meatballs are something that I ate in Germany all of the time! In Deutschland they are called Frikadellan or Hack Fleisch Kloese and are eaten without sauce. I was fidgeting around in the kitchen and put an Italian spin on them and they turned out really good!

I was seriously wanting to make some straight up German fare but was kind of in a hurry . . . so Italian took over! Plus I absolutely love making marinara sauce . . . I don't know why but it is one of my favorite things to make and is so easy to make from anything in the cupboard! This is a family favorite because it is super easy and delish! (It turns out even better if you listen to Sinatra while making it! . . . oh how my hubby loves walking in the door and hearing oldies! Lucky Guy!)
Cheese Stuffed Meatballs
Recipe by: Emily

1 lb Ground Beef
1/4 cup Bread Crumbs
3 tbsp grated Onion
1 Egg
1 tsp dried Chives
1/2 tsp dry Basil
1/4 tsp Garlic Powder
1 tsp Salt
1/2 tsp pepper
3 string cheeses cut in 16 chunks, or your favorite cheese cubed.

1.Combine ground beef, 1 egg, bread crumbs, grated onion, chives, basil, garlic powder, salt, and pepper together.
2. Use a cookie scoop to make even sized meatballs. To stuff the meatballs flatten each meatball a a thick patty in your hand and then place a piece of cheese in the center. Cover the cheese with the meat completely forming a meatball. Place meatballs on a baking sheet and cook in a 350 degree preheated oven for 15 -20 minutes. They bake faster than regular meatballs because of the cheese filling. (The cheese may come out a bit during baking.) These are good alone but I love to serve them with spaghetti and marinara sauce! Enjoy!

Quick, Easy and Delicious Marinara Sauce
Recipe by: Emily

2 14.5 oz cans Italian Stewed Tomatoes
1/2 cup Chopped Onion
2 Tbsp Olive Oil
1/2 tsp dried Oregano
1 tsp dried Basil
2 Garlic cloves, minced
2 Tbsp Tomato Paste
1 tsp Sugar
Salt
Pepper
Red Pepper Flakes

1. Saute the chopped onion in the olive oil in a medium sauce until translucent (8-10 minutes). Slightly puree the two cans of Italian Stewed Tomatoes with the minced garlic until chunky. Add all of the tomatoes to the onions. Add the basil, oregano, sugar, tomato paste, salt, pepper and a pinch of red pepper flakes to taste. Simmer over medium heat for at least 30 minutes to allow flavors to combine. Serve with pasta! Enjoy!

(This sauce freezes very well!)

Sunday, November 9, 2008

Chili Corn Chip Casserole

Well my chili is now officially gone! But it served us so well this week! My final chili recipe is one that is super easy and so delicious! I guess our fall chili days are officially over . . . it has been snowing a bit today, signaling the onslaught of winter and the lovely cold to come!

As a kid growing up I remember scanning thru what I thought was the coolest book ever "Today's Tips For Easy Living" by Dian Thomas. I guess she used to be the genius crafty lady on the Today show. Anyways I loved that book and last fall I found a copy at Deseret Book! It was the holy grail of all finds! I would have bought everyone I know one . . . but their was only one . . . so now I am relishing it! The ideas within are brilliant as are the recipes! I made the Chili Chip casserole for dinner the other night and my hubby LOVED it!!! (All I can say is fritos . . . in a casserole . . . with chili . . . and cheese = yummy!!!)
Chili Chip Casserole
1 lb hamburger
1 (8oz) can tomato sauce
1 (16 oz) can chili con carne
3 cups fritos
1 jalapeno chopped (optional)
1/2 cup grated cheddar cheese

Brown hamburger in skillet over medium heat. Drain off drippings. Add tomato sauce and chili con carne. Stir in 1 cup of fritos. Heat until warmed thru. Add jalapeno and cheese on top for added zip. Top with remaining fritos and bake in oven for about 10-15 minutes until bubbly or hot. Serve with sour cream and freshly diced onion. Serves 4 to 6 people.

(I just use leftover chili to make this! It is really good!)

Wednesday, November 5, 2008

More Chili . . . . Cincinnati Style with Dark Chili Chocolate!

Yesterday was just gorgeous . . . and I say that about a pretty gray, cold and windy day because the clouds were cascading over the mountains and just rolling down into the valley and up again! It reminded me of scenes of the mountains in the movie "Return to Snowy River."
When I was in first or second grade my bf and I would watch it whenever we had a sleepover and then talk about how dreamy Jim Craig was at school! Oh . . . remember the great music in that movie . . my sisters and I love to play it on the piano! Or how he jumped on his horse and took off after those mangy horse thieves and returned to the woman he loves on the mountain to live happily ever after! Oooooo!
Okay talking about movies . . . I caught part of Anna Karenina tonight on the tube, the old black and white one with Vivian Leigh . . . very dramatic ending! I love old movies! One of my fav's is the 1941 b&w "Jane Eyre" with Orson Welles and Joan Fontaine! I never tire of watching it! I can hear him calling out . . . Jane, Jane and her doe eyes always looking around. Okay moving on . . . This has just become chili week in our home! Another favorite chili recipe was shared with me by friends from Cincinnati. I really like it . . . you serve chili over spaghetti noodles topped with onions, cheese, sour cream etc. I added a little perk on top with shaved chili chocolate. It was oh soooo good! I have had chili with chocolate in it before but it wasn't my favorite, but the chili dark chocolate shavings on top were awesome! Talk about venture out! My hubby wasn't too keen on trying it but liked it in the end!
Cincinnati Chili
Chili

Spaghetti Noodles, cooked
Sour Cream
Shredded Cheddar Cheese
Chopped Onion
Chocolate shavings

Pile spaghetti in a bowl and ladle chili over it. Top with shredded cheddar cheese, sour cream, chopped onion, and shaved dark chili chocolate. Enjoy!

Tuesday, November 4, 2008

Navajo Tacos made with Em's Ultra Yummy Super Easy Award Winning Chili

Okay I have seen a lot of Chili being made lately . . . it is of course a great fall food and so nice to sit down to when the weather is becoming crisp and the smell of snow is floating in the air! I love Chili! In fact I have an award winning Chili recipe! (I promise that it is good!) However . . . I think that one of the very BEST ways to eat chili is in Navajo Tacos!!!
Okay if you have never had a Navajo Taco you are missing out on one of my very favorite things to eat! In fact while making them I thought of 5 reasons that they make my tummy grumble more than any other food! (Well, maybe . . .)
1-Scones! (Fried dough!) can I just say d-lish! 2-Leftover chili . . . put to good use! 3-Happy Husbands! (Its like writing I love you across your forehead!) 4-Clean out the fridge, you can load them up with salsa, lettuce, tom's, sour cream, cheese, onions, etc. . . if you are like me sometimes you have little leftovers or containers filled with all sorts of stuff . . . chances are you can pile it onto your taco! 5-They are d-lish! Yum-yum-yummer! We love them so much we even make them when we going camping!
Alrighty so I made a big pot of chili today (I love to freeze it too!) and we are putting it to good use on our Navajo Tacos! I can't wait to chow down! Just waiting for hubby to get home from meetings! I have included my chili recipe and have yet to find my Aunt's fry bread recipe! I will post it when I find it!
Navajo Tacos
Ladle chili over a piece of fry bread on a plate. Top the chili with lettuce, shredded cheese, sour cream, diced onion tomatoes etc. Enjoy!

Fry Bread Dough
This time I just thawed out Rhodes bread dough and cut it up and fried it . . . I couldn't find my Aunt's recipe but I will get it and post it soon.

Stretch out about 1/2 cup of dough into a disc and fry it in oil until both sides are browned.

Em's Ultra Yummy Super Easy Award Winning ChiliRecipe by: Emily
2 lbs Extra lean ground beef or turkey, or 1 lb of each
1 medium Onion, chopped
1 Green Bell Pepper, chopped
1 medium Zucchini, shredded
2 28 oz cans Diced Tomatoes
1 28 oz can Whole Peeled Tomatoes
1/4 cup Brown Sugar
1 can Tomato Paste,
2 tsp Onion powder
Cayenne Pepper
Salt
Black Pepper
1 Tbsp Chili Powder
1 14.5 oz can Pinto Beans, drained and rinsed
1 14.5 oz can Black Beans, drained and rinsed
1 14.5 oz can Kidney Beans, drained and rinsed
1 package chili seasoning mix, hot or regular

In a skillet brown the ground meat, season with salt, pepper, onion powder, and a pinch or two of cayenne pepper. Add the chopped onion and green pepper and cook until veggies begin to soften.

Put browned meat mixture into a large crock pot, add zucchini. Stir in the canned tomatoes. Add the chili powder, tomato paste, brown sugar, beans, and seasoning packet. Let chili cook in the crock pot for at least 4 hours, stirring occasionally. Taste and add more chili powder, salt, pepper or cayenne if desired.

You can also cook the chili on the stove if you like over a low heat for 4 hours rather than in a crock pot.

I like to cook the meat mixture the night before, toss everything in my crock pot on the low setting and not fret over it.
Serve with shredded cheddar cheese, sour cream, chopped onions, peanut butter (how the hubby likes it) shaved dark chocolate etc.

Sunday, November 2, 2008

Apple Crisp Cups with Caramel Sauce

Mmmm, I love Fall . . . don't care for winter much but love fall! This week is supposed to get really cold, I so look forward to it . . . it seems like the sky and air and world are totally gray for a good 3 or 4 months while we are hit with mountains of snow!
In preparation of such lovely events to come I made a comfort food that I remember making all the time for my family as a teen . . . Apple Crisp. However after digging through my cupboards and eyeing my beautiful Honey Crisp apples that were supposed to be coated in caramel and candy on Halloween I came up with a goody that curls my toes it is so good!
These little Apple Crisp Cups turned out pretty cute and very tasty! My hubby and I are all about watching a movie tonight, curling up in a blanket and indulging in a little dessert . . . of Apple Crisp Cups! I drizzled a little caramel on them and wa-hoo did that knock the ball of the park! I highly recommend drizzling anything and everything with caramel! (We did happily share them with our next door neighbors . . . they may not have lasted through the night if we had kept them! Augh!)
Apple Crisp Cups
Recipe by: Emily

5 cups thinly sliced, peeled Apples, I used Honey Crisp and Granny Smith
1/2 cup Brown Sugar
3 Tsp Butter
1 tsp Cinnamon
8 sheets Philo Dough (You could also use puff pastry dough)
Melted Butter

1. Melt 2 tsp of butter in a large skillet, add brown sugar, cinnamon, and apples. Cook the apples until tender and the brown sugar has thickened into caramel. Set apples aside.
2. Layer 5 sheets of Philo dough with melted butter. Cut the stack of buttered dough into 8 equal sections and place cut dough into a muffin tin creating cups. (cut, stack and butter the remaining sheets until all 12 cups of a muffin tin are full). Back the philo cups for 5 minutes in a 350 degree preheated oven.
3. After the cups have baked for 5 minutes,fill each cup equally with the cooked apples slices and then sprinkle 1 heaping tsp of the crisp topping on top of each cup. Continue baking in the oven for another 5 minutes or until bubbly and browned. Drizzle with caramel sauce and serve with Ice Cream or whipped cream if desired. Enjoy!

Crisp Topping
2 1/2 Tbsp Flour
6 Tbsp Quick Oats
5 Tbsp Brown Sugar
3 1/2 Tbsp melted Butter

Mix dry ingredients together first then add the butter and mix well.

Wednesday, October 29, 2008

Blood Clot Brew

Tonight we had a primary class Halloween party that rocked this world! We had such a blast and had plenty of candy on hand to fuel our fun!
We made some pretty spooky cupcakes! The kids loved loading the candy onto their cupcakes as you can see and created some wicked monsters!!! (Candy has advanced since I was a child! Now there are bloody gummy body parts and eyeballs! . . .Lucky!)
My favorite . . . well one of my favorite treats of the night, was our Blood Clot Brew! It was so easy to make and so much fun to drink! I was downing glass after glass but my hubby wouldn't touch it! The kids thought that it was pretty cool too. The first sip or two were kinda weird, and I tried not to think about blood clots but then you get that jelly texture in your mouth and . . . yeah it was awesome! My pictures don't do our creations justice! Time flew and so did my chance to take photos . . . Halloween just brings out the kid in me! I love it, love it, love it! I want more Brew! It was so much fun!

Blood Clot Brew
Recipe by: Emily

2 Quarts Fruit Punch or Red Kool-aid
1 1/2 Quarts Sprite or Seven-Up
1 Package Red Jello

1. Prepare the Jello according to package directions. Once it has set use a fork to break it up into little pieces.
2. Combine the Fruit Punch and Sprite in a punch bowl or large pitcher. Carefully pour the mangled jello into the punch mixture. Serve
(This stuff is red so be careful! . . . . It stains!) You could also put a gummy worm or gummy eye ball in each glass for extra festivity! For a little more upper scaled drink use raspberries instead of jello and crush them up a bit! To be extra, extra festive, add a little grape mangled jello for more "realistic" looking blood!
Time Saver: Use the jello snack size cups instead of going through all the work of making it yourself!

Tuesday, October 28, 2008

Chorizo Stuffed Breakfast "Skinnies"

My hubby loves eggs, he could eat them everyday for probably every meal . . . conflict: I am not a big egg eater, in fact to eat eggs they had better be loaded with veggies or something to take away from the "eggy-ness." So if my hubby wants them more often than not he makes them . . .
One way that I actually enjoy them is by adding chorizo to them and making a breakfast burrito . . . however on Saturday I felt adventurous and added a twist to breakfast when I was REALLY craving skinnies! Okay some people may be thinking "what is this lady talking about!?!" Skinnies are like skinny pancakes! I'd say they are more of a cross between pancakes and crepes actually.
We used to eat skinnies all the time when I was a kid! My mom and my aunt would make them . . . they are the best thing to wake up to in the morning (well next to my hubby) . . . they are easy to make and honestly don't need any filling or syrup, just roll'em up and chow down (maybe that's why they were super appealing to eat growing up!) Actually the addition of a little cream cheese and apricot or strawberry jam is pretty delightful too! I really loved filling them with something a little savory and spicy though! I made so many that we ate them for 3 days straight!
Skinnies
Recipe by Mama P.

1 cup Flour
6 Tbsp Sugar
1 tsp salt
4 Eggs
1 1/3 cups Milk
2 Tbsp Butter, melted

1. Sift together flour, sugar, and salt. Set Aside.
2. Mix eggs and milk. Add to the flour mixture and whisk until lumps are gone. Pour in the melted butter and stir.
3. Heat a 6 or 8 inch skillet over medium heat. (lightly grease if needed) Ladle 1/4 cup batter onto skillet. Swirl the skillet to spread batter out evenly. Cook until lightly browned and roll up. Serve with syrup, jam, or fill with eggs, meat and veggies. Enjoy!

To make them "Chorizo Style" I cooked 1/2 cup chorizo, 4eggs, and 2 Tbsp milk together. Layered a skinny with a mixture of rice and black beans, and chorizo eggs. Top off with sour cream and diced tomatoes. (Shredded cheese, jalapenos, salsa, chilies etc. would also be great to top with!)

Monday, October 20, 2008

Mini Pumpkin Mousse Pies

I love anything that has to do with Halloween! I love watching Halloween movies on TV (NOT gory ones or horror), and making food that's spooky and fun! I also LOVE decorating and and putting up cobwebs and creepy spiders, pulling out fall colors and jack-o-lanterns lighting up doorways!
My favorite part of Halloween is seeing what our nieces and nephews are dressing up as and going trick or treating with those that live close. This year we are going to gather as ghosts and ghouls and make caramel apples and I just can't wait! I am going to be major miffed if it snows again before then! I need one more outing before we are stranded in the valley for the winter!!! (I make it sound so dramatic . . . even though I am a Utah girl I still hate driving in the snow!) I made these little pies as a treat for a movie night and for our neighbors who just welcomed a new arrival! They turned out pretty cute and tasted even better!

Pumpkin MousseRecipe by: Emily

1/2 cup canned Pumpkin puree
1 can Sweetened Condensed Milk
8 oz Cream Cheese, softened
1/2 tsp Pumpkin Spice
1 1/2 cups Cool Whip

Mix the cream cheese and sweetened condensed milk together with a hand mixer until well incorporated. Add the canned pumpkin and pumpkin pie spice. Once the pumpkin mixture is smooth fold in the cool whip. Pour mousse into a graham cracker pie shell or spoon into cups to create individual servings and refrigerate until well chilled and set, 2-3 hours. Serve with additional whipped cream or ginger snaps! Enjoy!

Wednesday, October 15, 2008

Seafood Lasagna


I have to laugh over all of the hype and debate over Twilight. It is definitely different from Jane Eyre, Rainbow Six, The Gideon Trilogy, Night, The Three Musketeers, The Last Juror, (some of my recent reads) etc. but all books vary in the feel that they exhibit and the writing style . . . that is what makes them unique and amazing!
My hubby would definitely not enjoy Pride and Prejudice the way that I do, or think that Great Expectations would be a great afternoon read, but it is okay. We agree to disagree. Okay off of my soap box! (Thank you Prudy for your book enthusiasm! It is equally shared here!) I now want to go and read "The Legend of Sleepy Hollow" again!
I need a good book, I have gone back to my childhood a bit and am now reading a few by Gary Paulson. I remember reading Hatchet many times and being totally enthralled every time. I have read quite a few classics's lately but was miffed by The Three Musketeers. (I honestly prefer the movie!) I am caught up on all of John Grisham's, and Tom Clancy's, and am waiting for the third book in the Gideon Trilogy to come out and upon the recommendation of the kids in my Primary class have read Fablehaven as well (which I really liked). So if anyone has some good reads, let me know . . .
Seafood Lasagna
Recipe by: Emily

2 Cups Peeled and cooked shrimp, cut into bite size pieces
1 1/2 cups Crab meat, cut into bite size pieces (you can use scallops instead or imitation crab)
12 Lasagna Noodles, cook noodles according to package directions
3 1/2 cups Half and Half
3 cups Italian Shredded Cheese blend or Parmesan Cheese
2 Cloves Garlic, minced
1 Small Onion or 1 Leek, chopped (if you use a leek make sure you clean it very well!)
2 tsp butter
Salt
Pepper
2 Tomatoes, sliced or diced

1. Cook the onion in the butter in a medium sauce pan over medium heat until translucent. Add minced garlic and cook for 2 more minutes. Stir in half and half and season with salt and pepper, lower heat and allow to barely simmer, stir in 1 1/2 cups cheese and stir until smooth and melted, add the seafood and turn off heat.
2. Spoon 3 tablespoon of sauce onto bottom of a 9x9 inch pan and spread out. Lay one layer of Lasagna noodles in the bottom of pan overlapping noodle. Spread Half of the seafood mixture over the noodles trying to get mostly the meat rather than the liquid(You need to reserve at least 1/2 cup of the white sauce for the top.)
3.Layer the tomato slices over the seafood, sprinkle with 1/4 cup of cheese and top with another layer of noodles. Spread the remaining seafood mixture over the noodles, sprinkle with more cheese and top with the last noodle layer. Spread the reserved white sauce over the top and sprinkle with remaining cheese. Bake in a 350 degree oven for 25-30 minutes until bubbly and browned on top. Allow to sit for 5-10 minutes before serving to set up! Enjoy!

(I love leeks with seafood and tomatoes in this Lasagna! They go so well together!) If you don't feel like making lasagna, just use your favorite pastas (or whatever you have on hand) and mix everything together, sprinkle with cheese, and bake!

Tuesday, October 14, 2008

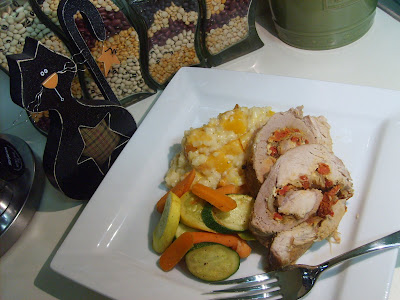
Goat cheese, Caramelised Onion and Sun dried Tomato stuffed Pork Loin

Oh Sunday's . . . I love it when I am able to just chill with my hubby or take a Sunday afternoon nap, especially since it is turning cold out and we will be buried in snow before you know it! (Nothing like trudging across campus to class and arriving looking like a wet dog!)
Since I had time to cook this weekend I really wanted to try something out that had some of my favorites in it . . . hence the stuffing for my pork loin! My husband did a double take when he heard that it had goat cheese in it (my Cache valley boy is ironically not a big cheese fan) but he liked it! I also ventured out and made Ina Garten's Butternut Squash Risotto (which is now on my top 10 favorite list!) with a few tiny alterations (no pancetta or saffron and I used pearl rice instead of arborio, which works exactly the same I think!). Holy delight!
Goat Cheese, Caramelised Onion and Sun dried Tomato stuffed Pork Loin
Recipe by: Emily

1 Pork Loin, about 3 lbs, (I cut a large one in half)
4 oz Garlic and Herb Goat Cheese
2 medium Onions, sliced thin
1/2 cup Sun dried Tomatoes
1 tsp Sugar
Salt
Pepper
Olive Oil
1. Caramelise the sliced onions in a large skillet with 1 tbsp olive oil and 1 tsp sugar. Cook over medium low heat until golden brown.
2.While onions are cooking butterfly the pork loin and spread the goat cheese all over it, sprinkle the sun dried tomato's on top and then top with the caramelised onions, salt and pepper.
3. Roll up the pork loin and secure with skewers or toothpicks to keep it rolled tightly. Salt and pepper the outside of the loin. Sear the pork loin in olive oil in the large skillet used to cook the onions in until browned on all sides.
4. Cover the skillet with tin foil or place the pork loin in a roast pan and roast in a 325 degree preheated for about an hour. Check the loin after 45 minutes with a meat thermometer to see when it reaches 170 degrees. Continue roasting if needed.
Once the pork loin reaches 170 degrees remove it from the oven and allow it to rest, covered, for 10-15 minutes. Carve and serve.

Sunday, October 12, 2008

Butternut Squash Soup

There is nothing like a hot bowl of soup on a cold snowy day! (Oh Utah, land of summer snow!) I love soup! It is the easiest and most versatile thing in the world to make (I think!). Squash soup is my FAVORITE (!!!) and their is always plenty of it at my house because my husband does not share the same love for it that I do! (Poor guy!) I love roasted squash in just about anything really! I roast a couple and then scrape them out and freeze them and throw a scoop or two into a lot of the things that I make. Squash is LOADED with vitamins and is a great thickening agent in stews, casseroles etc. I am still on my pumpkin seed oil kick so I added a bit on top of my soup and yes it was pure heaven! This soup is just too easy not to make!
Butternut Squash Soup
Recipe by: Emily

1 Butternut Squash, around 2 lbs
4 cups Chicken or Vegetable Stock
2/3 cup Half and Half
2 Tbsp Shallots, minced
1 Tbsp Olive Oil
Salt
Pepper
1/2 tsp Thyme
Dash of Red Pepper Flakes

1. Cut the butternut squash in half, scoop out the seeds and drizzle with olive oil then sprinkle with salt and pepper. Roast the squash in a 350 degree oven for about 35 minutes, or until very tender.
2. Add the minced shallot to a large sauce pan with 1 Tbsp olive oil and saute until tender. Add the chicken stock, thyme, salt, pepper, and red pepper flakes. Bring to a gentle simmer.
3. Scoop out the flesh from the roasted squash and puree in a blender adding some of the chicken broth to make it smooth or add the squash to the stock in the large sauce pan and puree with a hand blender until smooth.
4. Add the half and half, check for seasoning and serve.